Showing posts with label copic colouring. Show all posts

Friday, November 3, 2017

Christmas Partying Penguins

Brrrrr ... it is cold outside today. We woke up to a skim of snow covering everything this morning making it a perfect day to grab a coffee and head to the craft room. I have a few images to finish colouring before I start making Christmas cards.

One of those images just happened to be these cute partying penguins from the October Kit and Clowder class.  I have coloured it up following the class instructions and suggested colours.  The tree looked like it was going to be difficult but following Alyce's steps, it all came together nicely.


I coloured this image with Copic markers and used a Prisma white pencil for the falling snow and a white gel pen for the tree highlights.  Before I add this cute colouring to a card some glitter maybe in order.  After all, everything is better at Christmas with a little glitter!

You can find Penguins Party at Whimsy Stamps.  


Thanks for stopping by. Feel free to leave a comment. 

Tuesday, August 22, 2017

Magical Bookworm Fairy Scene

Can you believe we are nearing the end of summer!  Time seems to fly by faster these days.  I hope you all found some time to colour, make a card or craft between the beach runs, work and kids play dates.

My recent colourings and cards haven't made it onto the blog.  It is much easier to type a few lines on the Colours n Cards Facebook page and hit post.  A writer I am not!!

That being said, once again out came the big girl panties as I decided it was time to start posting once again. What better way to gingerly slide back into blogging then with a finished colouring of the monthly marker class at Kit and Clowder.

This class covered hand drawn backgrounds, magical skies and transparent fairy wings.  All techniques that would be useful for future colourings to adorn cards and crafts.


completed bookworm fairy scene coloured with copic markers
Now isn't this a magical place to catch up on your reading. 


I have include some of the WIP (work in progress) pictures below that show some of the steps that lead up to the completed colouring. 


trees, sky and hair coloured on wip bookworm fairy scenebookworm fairy scene with trees & grass coloured sky coloured on bookworm fairy scene wip


All colouring was done with Copic markers on X-press It blending card. White accents were added with a white Signo uni-ball pen.


Thanks for stopping by.  Feel free to leave a comment.  Happy colouring!


Monday, November 21, 2016

Standing Under the Mistletoe

I don't know anyone that doesn't like to receive Christmas cards. Do you?

With that in mind I am still in full card making mode.  I try to make all my Christmas cards but unfortunately fall short at times.  I really must start earlier.

Today's card is using a digital stamp from the talented artist Heather Valentin.  I was lucky to have been a past design team member at Lacy Sunshine and have a soft spot for her images. 


Christmas card featuring Rory and Mikey standing in snow under mistletoe
Rory and Mikey Under the Mistletoe

All paper and embellishments are from my stash.  Rory and Mikey are coloured with Copic markers.  Snow flake die: Giovanna Snowflake. Snow texture: Snow-tex.  Stickles added for glitter.

Thanks for stopping by.  Happy colouring!

Saturday, October 1, 2016

My Colouring of Harvest Elf is a Winner!

I am over the top excited today to learn that Mitzi, from Aurora Wings Stamps pick my colouring of her digi, Harvest Elf for the Artist Choice Award in her September Facebook challenge!!  Happy dancing here. What an honor!  I look forward to colouring more of her fantastic digital stamps.

Coloured Harvest Elf Artist Choice Award winner


ACA blog badge on colours n cards


Winners for the Sept Facebook challenge at Aurora Stamps

Thank you so much Mitzi and a big Congratulations to all September challenge winners!

Thanks for stopping by.

Wednesday, August 3, 2016

VaVa Voom!

Hi! Today I am sharing a recently completed "dude" card. I made this card for my middle son's birthday.  In the past couple of years he has been bitten by the racing bug and drives a truck in the "crash to pass" races.  

After some Googling I found the perfect images at Kenny K Stamps. Merging these two digi's, Cool Trucker and Honey Sparks together created the perfect image for his card.  

Seeing this was cartoonish .. is that even a word, I kept the card bright and minimal. You may not be able to tell from the photograph but I did get some sparkle in using black glitter tape on  two corners and glitter around the "silver" cup.  I know it looks black but it is silver. 


card VaVa Voom colours and cards

This image was coloured with copic markers.  One of these days I am going to remember to write down what colours I used.  Here is a partial list:

EOOO, EOO,EO4,E11,E21
B91,B93,B95,B97
YG11,G21,G94,G99
E21, E25, E29
C1,C3,C5,C7,C9
W1,W3,W5
Sorry I can't remember the rest :)

Thanks for stopping by.

Thursday, May 26, 2016

Holy Smokes! Valcanoes, Cute Kids & a Dinosaur!!!

Hi Everyone!

I know it has been a while since I have posted  ... along with the sunny weather arriving so have the outside chores!  

Between washing the deck and playing in the dirt with bedding plants I did find time to finish the April Create and Learn Class by Kit and Clowder.
 
Today we are heading back in time to the land of dinosaurs and smokey volcanoes.

The cute image used for this class is called Best Friends Dinosaur by Polkadoodles.  Usually I draw in the background following Alyce's instructions but this time around I took the quicker option and used the digi and background combo.  All colouring was done with Copic markers.


In these 2 WIP images things were coming together nicely, in the beginning .....

Dinosaur scene background colouring in progress Colours and CardsDinosaur scene background near completion - Colours and Cards


Then ..... colouring turned into a challenge!  I was experiencing the frustration of multiple markers going dry.  Of course it was ones I wanted to use and had no refills for!  And if that wasn't frustrating enough I was having to change colours, in the middle of colouring!!  Needless to say the image turned out a bit different than expected but all in all it seems to have worked out.


Valcanoes, Dinosaur colouring with copics - Colours and Cards


Thanks for stopping by.  Feel free to post a comment.  I would love to hear from you.

Sunday, April 3, 2016

Sweet Flower Gnome Card

Hi everyone!  Today I am sharing a card made using Sweet Flower Gnome by artist Heather Valentin.  

I pictured her in a meadow type setting surrounded by flowers and grass rather than a cultured garden.  All colouring was done with copic markers with the exception of the small white accent dots in the grass.  Those were done with white pen.  Stickles glitter was added to the butterfly on the flower she is holding.  Copic colours used can be found at the bottom of this post.


sweet flower gnome card created by joanne - colours and cards

All papers and embellishments are from my stash box.

close up of coloured sweet flower gnome on colours and cards

Isn't she cute!

copic colours used on sweet flower gnome - colours and cards

Need more gnomes ... head  over to the Anything Goes Challenge blog at Lacy Sunshine and check out all the wonderful Gnomes on the blog today.  Add your creations for a chance to win.

Sunday, March 6, 2016

Wildly Cute Lil Flamingo Boo

The DT Team A challenge this month  is "wild" and I think Lil Flamingo Boo is wildly cute!!


She can be found over at the Lacy Sunshine Stamp Shoppe as a individual digital stamp or hanging out with her friends on the Zoo Boos Coloring Set #1.  Pop over to the Shoppe and check out all of Heather Valentin's images. 


Lil Flamingo Boo Card by Joanne B on Colours and Cards


For this card I started with a black card base and using my Cricut, cut the pink cover from card stock using a free SVG by Birds Cards call Card Cover 3.  The pink and silver cord was a left over found in my stash that threaded nicely through the frame holes.  I added 4 small pieces of white card stock to each corner flower along with 4 black black beads. White beads were added to the rest of the flowers.  

Close up of coloured Lil Flamingo Boo on Colours and Cards

Lil Flamingo Boo was cloloured with Copic markers (colours below) and the image edges were inked with graphite black ink.   The white dots on cheeks and sash were done with white Signo pen.


Copic colours used on Lil flamingo Boo


Check out the "WILD" Lacy Sunshine Facebook Challenge. 


Check out the Wild Lacy Sunshine FaceBook Challenge

Wednesday, February 17, 2016

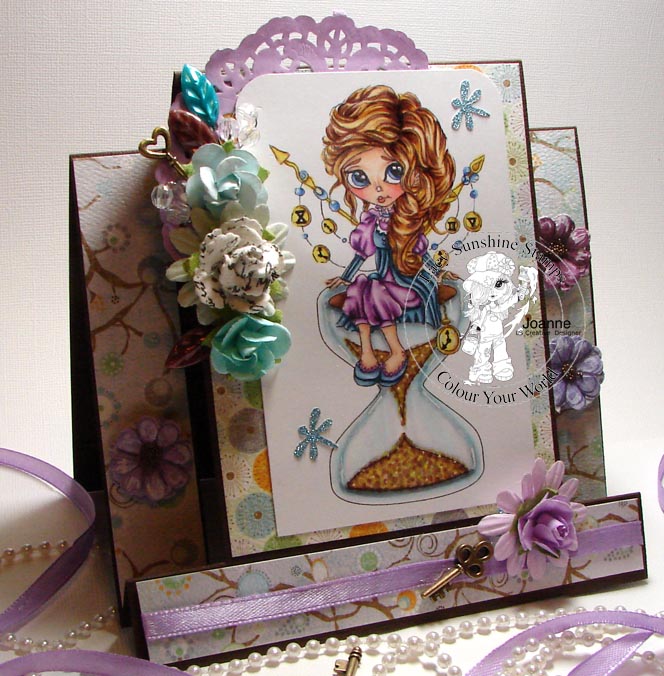
Center Step Card Featuring Saniya Time Ethereal Enchantress

Hi everyone!   

Today I am showcasing one of Heather Valintin's digis from her Enchantress line.  She is called Sainya Time Ethereal Enchantress!  Isn't she fabulous!  Perfect for those "time" related cards and projects.  


Featuring Sanya Time Ethereal Enchantress


side view of center step card with Sanya time Ethereal Enchantress


All colouring was done with Copic markers with the exception of the Roman numbers and hands on the little clocks. I used a fine Sharpie black pen for them. The white lines on the hour glass were done with Uni-ball Signo white pen. 

close up of coloured Sanya Time Ethereal Enchantress


Saniya Time Ethereal Enchantress needed something to sit on so I added the hour glass.  Why an hour glass? No reason other than it was the first thing that came to my mind when I saw her!

The hour glass is actually a wingding that I edited in Corel Draw.  In order to have Saniya sit on the hour glass I created a transparent background around the original digi in Photoshop, saved it as a png file then merged the two together and saved them as a grouped jpeg file.  


List of colours used on Sanya Time Ethereal Enchantress


The paper is by Crate Paper from their Sweet Branch Collection called Blossom.  It has been in my stash forever.  The stick pin leaves are from one of Heathers Crafter's Candy Boxes as are the little crystal beads. The keys are from Michaels and all other embellishments are from my stash.

This center step card is a first for me.  I started with a 12" x 6" sheet of card stock.  See the template below.  Fold on the dotted lines, cut on the solid lines from 2" to 7".

Center Step Cart Template by Colours and Cards


Finished Step Card with Sanya Time Ethereal Enchantress


Saturday, January 16, 2016

Wisteria Bloomin Treasures Colouring Storage Folder

Lately my "mojo" has been MIA.  Don't you just hate when that happens!  The trash bin saw more than it's fare share of colouring.  Then while looking for file storage online one night, up pops a tutorial to make your own!  Mojo is peeking over my shoulder ... I have the perfect paper in mind ... who would have thought a file storage search would restore creative harmony! 
  
I am using Wisteria Bloomin Treasures by artist Heather Valentin.  She is one of the lovely digi's from the Lacy Sunshine Blommin Treasures Coloring Page.  Of course she didn't want to be by herself so her friend, Plum Blossom Flower of Peace, from the same colouring page is also here today. You can find them at the Lacy Sunshine Shoppe

Now I have a special place for all my coloured LS stamps that is portable and pretty to look at!


 Wisteria Bloomin Treasures - Colouring Storage Folder


Wistera Bloomin Treasures colouring storage folder

A ribbon holds the folder closed making it easier to adjust as the folder expands

Colouring storage back view showing clear pocket
Back View
With the addition of a clear pocket, made using transparency film, there is a place for WIP colourings like Plum Blossom Flower of Peace Bloomin Treasure 

Divider view of Colouring Storage Folder
Inside of Colouring Storage Folder
Room for a growing collection with colourful dividers and expandable sides

Side view of Colouring Storage FolderCloseup side view of Westeria Bloomin Treasures Folder 

Close up of coloured Westeria Bloomin Treasures
Coloured with Copic Markers

copic colours used on Westeria Blooming Treasure


Cover paper Cherish by Carte Paper
Inside card stock from my stash
Flowers and Embellishments from my stash
Die Cuts Spellbinders Triple Tear
Transparency Film 

I had full intentions of taking photo's and adding instructions as the project progressed  but was so engrossed that I forgot and only have 2 WIP pictures to show you. There is a link to the tutorial at the end of this blog.

View of Colouring Storage Folder dividersBottom view of Coloring Storage Folder

Things adjusted to suit my needs: 
  1. added the clear "pocket" on the back using a transparency
  2. added 2 additional score lines to the top flap for easier closing adjustments
  3. used a heavier patterned card stock instead of covering the front and back pieces
  4. score tape was used instead of glue

Thanks to Pion Designs for the tutorial 


Sunday, November 22, 2015

Sharing Weekend Colouring

Hi everyone. Today I am sharing some colourings I completed over the weekend.  Here are the 2 from Lacy Sunshine Stamps by artist Heather Valetin. Heather's digi's are so much fun to colour up. 

For this image I merged 2 stamps Mistletoe's Ornament and Coco's Holiday Ornament. They have been coloured with Copic markers and I used Snow-tex and glitter to give the snow dimension. Next step cards.

Mistletoe's Ornament & Coco's Holiday Ornament


Colours and Cards Colouring


Mistletoe's Ornament with Created Background


Colours and Cards Mistletoe's Ornament

I created a Christmas type tree backgound for this little cutie. She is coloured with Copic markers

Monday, November 9, 2015

Why Not A Purple Snowflake

It's that time of year!  You are going to see a lot of Christmas Cards popping up on my blog.  Today I am sharing one with Iced Bleeding Heart Flower Pot Pretty from Lacy Sunshine Stamps.  

Thought I would try something different and match the paper to the background.  The paper and flower were in on of Lacy Sunshine Crafters Candy boxes.  The digital stamp was coloured using Copics.  Lace is from my stash. 

Iced Bleeding Heart Flower Pot Pretty Christmas Card


Coloured with Copics
Background water colours
Snow-tex and glitter
Giovanna snowflake die