Showing posts with label colours and cards. Show all posts

Sunday, March 26, 2017

Robin Colouring - Welcome Spring

 This robin colouring is perfect to welcome the first days of spring.  You can find this image in the March Kit and Clowder monthly class.

While gathering the copic markers I was going to use I realized that this was going to be a first for me.  Intimidating!  You bet it was!  I had never coloured a bird image before!!  

It all came together and I must admit I am pleased with the result.  No plans to make a card at the moment.  I may look around for a frame instead. 


Robin sitting on a branch surrounded by butterflies. berries, leaves and flowers coloured with Copic markers on Colours n Cards
The finished colouring with a background added.


leaves coloured with copic markers
Leaves, Berries, Flowers coloured with copics on colours and cards
I found that breaking the image into categories like leaves, berries and flowers made the image less intimidating. 

I started with the leaves and then moved on to the berries and flowers. 

Colouring sections or categories seems to work well for me. There is never enough time to do a complete image in one sitting these days.

Do you find yourself doing bits and pieces when time allows also?


Robin coloured with copics on tree branch with flowers, butterflies, berries,leaves and plain background

This  picture was taken before the back ground was added.  
I think it looks good either way! 

Thanks for stopping by.  Happy Colouring!


Tuesday, November 22, 2016

Christmas Cards Featuring Reggie & Rory

I hope your not getting tired of Christmas cards yet!  Two more have joined the Christmas card parade.

Once again I am using digital stamps by Heather Valentin.  You can find her stamps along with some awesome colouring books at Lacy Sunshine Stamps.

Watch out!  Here comes Reggie's Winter Sled. 


Christmas card with boy wearing green hat and red scarf on sled

Paper, ribbon and pearl embellishment are from my stash. Snowflake die: Giovanna Snowflake. Digital stamp coloured with Copic Markers.  I used Stampendous Winter Wonderland embossing powder to create snow and add dimension.  Crystal Stickles lend sparkle to the snow and background.  Sentiment was stamped with a clear stamp and Memento black ink. 


Rory is ready to do some decorating!  This is Rory's Decorations.


Christmas card with Rory holding sack of decorations outside in snow

Rory is coloured with Copics and unfortunately I forgot to write down the colours used. Paper and embellishments are from my stash.  Snow flake: Giovanna Snowflake die.  I mixed Stampendous winter Wonderland embossing powder with Recollections Vintage Blue opaque sparkle for the snow and Stickles add extra background sparkle.


Thanks for stopping by.  Happy Colouring!


Sunday, November 20, 2016

Christmas Card Parade Continues

The Christmas card parade continues with two more completed cards.

The next two cards feature digital images from Aurora Wings .

The digital images were coloured with Copic markers. All embellishments and papers are from my stash. Stickles were used on both cards to add glitter.

christmas card with poinsettia sprite holding a present
Poinsettia Sprite

Copics used E000, E00, E04, E11, E21, R22, R29, R59, C5, YR23, Y06. B91, B95, G21, G94, G99
Triple Tear Die from Spellbinder was also used to create fancy circle.

Christmas card with little sprite holding Christmas lights
Christmas Lights Sprite
Copic colours used: E000, E00, E04, E11, E21, R20, R81, R83, R85. R86, C0, C1, B05, BG01, B000, G05, G03, YG01, Y00, Y06, Y08


Thanks for stopping by.  Happy Colouring, Carding and Crafting.

Monday, October 10, 2016

Spooky Cute Halloween Card

Today I am sharing a card made using a free digi from Heather Valentin.  Broomkin Troll can be found frolicking with her troll friends over at Lacy Sunshine Stamps.  Don't you think she is a perfect fit for a Spooky Cute Halloween card?

After colouring Broomkin Troll with copic markers I spied some Halloween paper in my stash box along with some black webbing (?) and purple flowers ... Ta Da!  A Halloween card was just a few waiting to be created.


Coloured Troll, orange hair, purple hat with stars, black webbing and purple flowers


The following Copics were used:

E000, E00, E11, E21, R12, R20
E08, YR14, YR18, YR21, Y06
G21, G94, G99
V000, V01, V04, V06, V09, Y11. Y15, Y17
C0, C1, C3, C5

I have entered this card in the October Facebook Challenge at Lacy Sunshine Colour n Craft Community.

Thanks for stopping by.

Monday, September 12, 2016

Recent Colourings

Hi all.  I seem to be posting more on the Colours n Cards Facebook page than on the blog these days.

Why?  Well .. I had full intentions of making cards with my recent colourings and posting the cards on the blog but I haven't been "card making" motivated lately.  I prefer to wait until, dare I say .. the crafty planets line up and everything seems to flow from start to finish!   Do you ever feel like that?

In the mean time, I will continue colouring and adding to my "ready to card" pile while I wait for some card making mojo to return.

I was going to add all the colourings to this post but in order to keep it short lets just showcase one artist tonight. I have coloured more than I thought :)

Here are a few coloured digi's from Lacy Sunshine Stamps by Heather Valentin.  If you follow me on Facebook this will be a  deja vu experience for you.


mayde's puppy's bathtime coloured - colour n cardsrory's ornaments coloured on colours and cards

Rory and Mikey Under the Misteltoe colouredcoloured frozen pansy - colours and cards

Mattie Hattie Mer's Tea Party coloured - Colour n Cards


More colouring coming soon.

Thanks for stopping by.  Feel free to leave a comment. 

I love to hear what you think.


Friday, July 29, 2016

Sharing a couple of cuties today.

Hi all.  Popping in today to share two recent copic colourings.  Both of the shares today were freebies from two of the many sponsors of the Kit and Clowder 10,000 party.  

Up first is Fairy Swing from All Dressed Up Stamps.  Isn't she sweet?  


Fairy Swing on Colours n Cards


This next coloured digi is from East Wind Digi Stamps.  Super Chunky was a bit of a challenge for me.  Like I know how to colour a cat! 

Well .. on came the big girl panties and out came the Copics!  Yes there is room for improvement but one has to start to improve!! Right!


Super Chunky on Colours n Cards


Thanks for stopping by Colours n Cards.  You can also find me on Facebook. 

Don't forget to follow the links and check out the other images available by these wonderful artist.  I promise you won't be disappointed! 

Feel free to leave a comment.

Monday, July 18, 2016

Colouring Crystals

Hi everyone!  It has been forever since I last posted.  Summer days find me hanging outside more and inside colouring less.  As most of you know I am a huge fan of Kit & Clowder and have been taking the online monthly class since ...well, forever.  The beauty of these classes are you end up with a finished project/image and you can do them whenever, no time limit!  

Today I am sharing my progress with the July class using the beautiful digi Crystal by Lineartsy .  First impression seeing this image so beautifully coloured by Alyce ... you got to be kidding!!  I am never going to be able to do that!  

I purchased, sized and printed Crystal, printed out the class, organized my copics then proceeded to find every excuse not to sit down and start colouring!  Maybe I will just read some of the class instructions, after all I wanted to know how to colour crystals. 

That was all it took!  Following Alyce's instructions and working in sections ... Hey, I can do a section ... helped me to finish this beautiful image.


Class colouring started with the crystals
Adding depth to the crystals with outline
Work in progress by Joanne - Colours and Cards
  Next step skin, gems and outfit 


Coloured image of Crystal by Lineartsy

Crystal by Lineartsy 

Coloured following class instructions by Kit & Clowder

Thanks for stopping by.


Thursday, May 26, 2016

Holy Smokes! Valcanoes, Cute Kids & a Dinosaur!!!

Hi Everyone!

I know it has been a while since I have posted  ... along with the sunny weather arriving so have the outside chores!  

Between washing the deck and playing in the dirt with bedding plants I did find time to finish the April Create and Learn Class by Kit and Clowder.
 
Today we are heading back in time to the land of dinosaurs and smokey volcanoes.

The cute image used for this class is called Best Friends Dinosaur by Polkadoodles.  Usually I draw in the background following Alyce's instructions but this time around I took the quicker option and used the digi and background combo.  All colouring was done with Copic markers.


In these 2 WIP images things were coming together nicely, in the beginning .....

Dinosaur scene background colouring in progress Colours and CardsDinosaur scene background near completion - Colours and Cards


Then ..... colouring turned into a challenge!  I was experiencing the frustration of multiple markers going dry.  Of course it was ones I wanted to use and had no refills for!  And if that wasn't frustrating enough I was having to change colours, in the middle of colouring!!  Needless to say the image turned out a bit different than expected but all in all it seems to have worked out.


Valcanoes, Dinosaur colouring with copics - Colours and Cards


Thanks for stopping by.  Feel free to post a comment.  I would love to hear from you.

Saturday, April 30, 2016

Colouring Hydrangeas with Kit & Clowder

Happy Saturday everyone!  I just realized I forgot to put the hydrangeas I coloured from the Kit & Clowder Elements of Nature Class on the blog.  If you follow my blog you know I am taking a few of Alyce's classes. 

They were posted on the facebook page but not the blog... my bad.  I have coloured these with my favourite markers, Copics, following Alyce's lesson.  

I think a touch  of pink might be nice next but I do like the finished results.  What do you think?


Here is a look at the WIP ... flowers are coloured, time to start on the pot.


... and here is the finished colouring.  


Thanks for stopping by.  Feel free to leave a comment.

Wednesday, April 13, 2016

Lil Hot Mama Scootabug Card

Today is my day to post for Lacy Sunshine using Lil Hot Mama Scootabug by artist Heather Valentin.  What a fun digi stamp this is!  

I also used the Gnome house from the Digi bits sheet, found under the Gnomes of Willow Pines  line for this card.


Hot Mama Scootabug Card by Joanne

Lil Hot Mama Scootabug


close up of coloured Lil Hot Mama Scootabug

I must admit to taking a creative twist with theses two images by merging the two together and creating this scene.  I coloured everything with copics, added the googly eyes and  a bow to the caterpillar.  In my stash of "interesting stuff to use on day" were some lightly shaded plastic dots that fit perfectly in Mama's glasses. White highlights were added with a gel pen.


recipe of copic colours used

Thanks for stopping by.  Happy Colouring!


Sunday, April 3, 2016

Sweet Flower Gnome Card

Hi everyone!  Today I am sharing a card made using Sweet Flower Gnome by artist Heather Valentin.  

I pictured her in a meadow type setting surrounded by flowers and grass rather than a cultured garden.  All colouring was done with copic markers with the exception of the small white accent dots in the grass.  Those were done with white pen.  Stickles glitter was added to the butterfly on the flower she is holding.  Copic colours used can be found at the bottom of this post.


sweet flower gnome card created by joanne - colours and cards

All papers and embellishments are from my stash box.

close up of coloured sweet flower gnome on colours and cards

Isn't she cute!

copic colours used on sweet flower gnome - colours and cards

Need more gnomes ... head  over to the Anything Goes Challenge blog at Lacy Sunshine and check out all the wonderful Gnomes on the blog today.  Add your creations for a chance to win.

Tuesday, March 29, 2016

Flower Colourings

Recently my hubby bought me a birthday gift of the Elements of Nature class by Alyce Keegan at Kit and Clowder.  How lucky am I!  If you are looking for easy to follow, step by step informative classes, with videos I would highly recommend checking Alyce's classes.  I have 3 other classes as well as the ongoing monthly one so needless to say I am a fan.

Colouring flowers and have them look like flowers with petals, depth and shading has been on my colouring wish list.  There is always room for improvement but I am one happy student!

Here are the results of the Daffodil and Gerberas classes coloured with copic markers on x-press it. I jumped the gun and posted them on the Colours and Cards facebook page first.  Yes I was that excited! 


Daffodil


daffodil colouring by Joanne B - colours and cards


Gerberas


Gerberas colouring by Joanne - Colours and Cards


More colourings can be found on the Colours and Cards facebook page here.

Wednesday, March 23, 2016

Welcoming Spring with Annabelle Melancholy Moppet

Today I am welcoming Spring with a card featuring one of the fabulous Melancholy Moppets from artist Heather Valentin called Annabelle Melancholy Moppet. The Melancholy Moppet digi's  can be found exclusively at the Lacy Sunshine Shoppe. 


Spring card using Annabelle Melancholy Moppet

You will find a recipe card with a list of the copic markers I used at the end of this post. 

Close up of card image Annabelle

All papers and most embellishments are from my stash.  The flowers are from Michael's and the circle die was cut using Spellbinders Triple Tear and Sizzix BigKick.


List of copics used to colour Annabelle

Thanks for stopping by. Happy Colouring!


Thursday, March 17, 2016

BeYou - Haley by artist Heather Valentin

Have you seen the new line of digi's just released at Lacy Sunshine?  If not I suggest you pop over to the Shoppe and check out the Heather Valentin Kids Street line!  It is amazing!  

Here is Be You - Haley Kidz Street Collection


Coloured with Copic markers. Dots added to hair with white gel pen.

Happy Colouring!

Sunday, March 6, 2016

Wildly Cute Lil Flamingo Boo

The DT Team A challenge this month  is "wild" and I think Lil Flamingo Boo is wildly cute!!
  

She can be found over at the Lacy Sunshine Stamp Shoppe as a individual digital stamp or hanging out with her friends on the Zoo Boos Coloring Set #1.  Pop over to the Shoppe and check out all of Heather Valentin's images. 


Lil Flamingo Boo Card by Joanne B on Colours and Cards


For this card I started with a black card base and using my Cricut, cut the pink cover from card stock using a free SVG by Birds Cards call Card Cover 3.  The pink and silver cord was a left over found in my stash that threaded nicely through the frame holes.  I added 4 small pieces of white card stock to each corner flower along with 4 black black beads. White beads were added to the rest of the flowers.  

Close up of coloured Lil Flamingo Boo on Colours and Cards

Lil Flamingo Boo was cloloured with Copic markers (colours below) and the image edges were inked with graphite black ink.   The white dots on cheeks and sash were done with white Signo pen.


Copic colours used on Lil flamingo Boo


Check out the "WILD" Lacy Sunshine Facebook Challenge. 


Check out the Wild Lacy Sunshine FaceBook Challenge

Wednesday, February 17, 2016

Center Step Card Featuring Saniya Time Ethereal Enchantress

Hi everyone!   

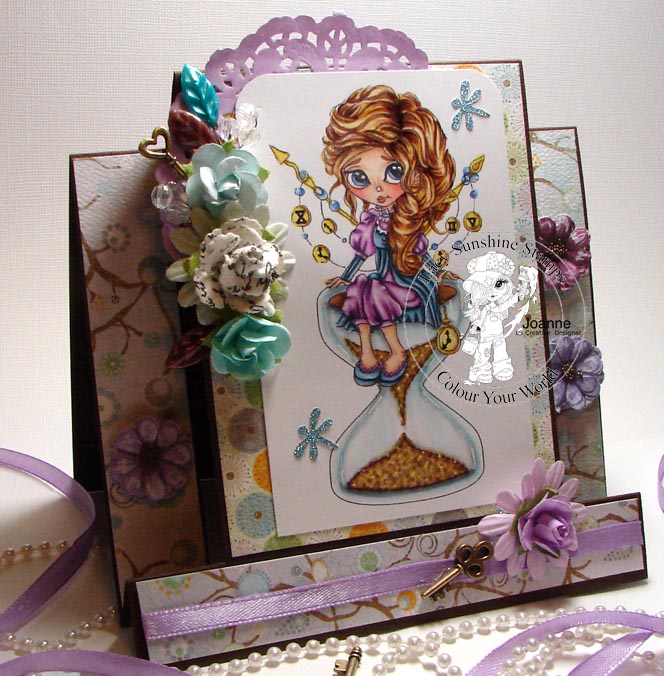
Today I am showcasing one of Heather Valintin's digis from her Enchantress line.  She is called Sainya Time Ethereal Enchantress!  Isn't she fabulous!  Perfect for those "time" related cards and projects.  


Featuring Sanya Time Ethereal Enchantress


side view of center step card with Sanya time Ethereal Enchantress


All colouring was done with Copic markers with the exception of the Roman numbers and hands on the little clocks. I used a fine Sharpie black pen for them. The white lines on the hour glass were done with Uni-ball Signo white pen. 

close up of coloured Sanya Time Ethereal Enchantress


Saniya Time Ethereal Enchantress needed something to sit on so I added the hour glass.  Why an hour glass? No reason other than it was the first thing that came to my mind when I saw her!

The hour glass is actually a wingding that I edited in Corel Draw.  In order to have Saniya sit on the hour glass I created a transparent background around the original digi in Photoshop, saved it as a png file then merged the two together and saved them as a grouped jpeg file.  


List of colours used on Sanya Time Ethereal Enchantress


The paper is by Crate Paper from their Sweet Branch Collection called Blossom.  It has been in my stash forever.  The stick pin leaves are from one of Heathers Crafter's Candy Boxes as are the little crystal beads. The keys are from Michaels and all other embellishments are from my stash.

This center step card is a first for me.  I started with a 12" x 6" sheet of card stock.  See the template below.  Fold on the dotted lines, cut on the solid lines from 2" to 7".

Center Step Cart Template by Colours and Cards


Finished Step Card with Sanya Time Ethereal Enchantress


Sunday, February 7, 2016

Peacock Etheral Enchantress Card

The challenge this month was to follow a Mardi Gras theme.  How fun is that!  Feathers, bright colours, glitter .. what's not to like!  


I am showcasing Peacock Etheral Enchantress by artist Heather Valentin.  


Isn't she fabulous! 


Mardi Gras Theme card by Colours and Cards with Peacock Etheral Enchantress

Peacock Etheral Enchantress  


Peacock Enchantress is coloured with Copic markers (recipe card below) and lavishly embellished with glitter paper, feather, flowers, beads, stickles and even a couple of butterflies.  All embellishments and paper are from my stash.  

Using feathers on a card was a first for me.  I must admit to liking the soft look they create here.  The butterflies are sitting on a die cut Rococo Petites Acorn Swirl which I cut with the Sizzix BigKick.


Pop over to the Color N Craft Anything Goes Blog and check out all the DT Mardi Gras makes.  Better still, why not add your latest make for a chance to win this digi from Lacy Sunshine.

Thanks for stopping by.  Feel free to post a comment.  I would love hear from you.


Saturday, January 16, 2016

Wisteria Bloomin Treasures Colouring Storage Folder

Lately my "mojo" has been MIA.  Don't you just hate when that happens!  The trash bin saw more than it's fare share of colouring.  Then while looking for file storage online one night, up pops a tutorial to make your own!  Mojo is peeking over my shoulder ... I have the perfect paper in mind ... who would have thought a file storage search would restore creative harmony! 
  
I am using Wisteria Bloomin Treasures by artist Heather Valentin.  She is one of the lovely digi's from the Lacy Sunshine Blommin Treasures Coloring Page.  Of course she didn't want to be by herself so her friend, Plum Blossom Flower of Peace, from the same colouring page is also here today. You can find them at the Lacy Sunshine Shoppe. 

Now I have a special place for all my coloured LS stamps that is portable and pretty to look at!


 Wisteria Bloomin Treasures - Colouring Storage Folder


Wistera Bloomin Treasures colouring storage folder

A ribbon holds the folder closed making it easier to adjust as the folder expands

Colouring storage back view showing clear pocket
Back View
With the addition of a clear pocket, made using transparency film, there is a place for WIP colourings like Plum Blossom Flower of Peace Bloomin Treasure 

Divider view of Colouring Storage Folder
Inside of Colouring Storage Folder
Room for a growing collection with colourful dividers and expandable sides

Side view of Colouring Storage FolderCloseup side view of Westeria Bloomin Treasures Folder 

Close up of coloured Westeria Bloomin Treasures
Coloured with Copic Markers

copic colours used on Westeria Blooming Treasure


Cover paper Cherish by Carte Paper
Inside card stock from my stash
Flowers and Embellishments from my stash
Die Cuts Spellbinders Triple Tear
Transparency Film 

I had full intentions of taking photo's and adding instructions as the project progressed  but was so engrossed that I forgot and only have 2 WIP pictures to show you. There is a link to the tutorial at the end of this blog.

View of Colouring Storage Folder dividersBottom view of Coloring Storage Folder

Things adjusted to suit my needs: 
  1. added the clear "pocket" on the back using a transparency
  2. added 2 additional score lines to the top flap for easier closing adjustments
  3. used a heavier patterned card stock instead of covering the front and back pieces
  4. score tape was used instead of glue

Thanks to Pion Designs for the tutorial